
Total Solar Eclipse 2019 July 2
A total solar eclipse is passing over Chile and Argentina on July 2nd! Here are some things to know for photographing the eclipse with the Timelapse+ VIEW Intervalometer.
Interested in joining Elijah Parker from Timelapse+ in Chile to learn all this hands-on for the next total solar eclipse in December 2020?
TEST EVERYTHING
As long as you have time to run a test with it, I recommend using the latest v1.8-beta81 firmware for the eclipse. The last total solar eclipse on 2017-08-21 was captured successfully with v1.8-beta7. Since then, many improvements have been made including better sun tracking calculations and more camera support, as well as an entirely new app. However, the core code for the eclipse circumstances has not changed.
Make sure to test your complete setup for the eclipse. The VIEW has a special eclipse mode allowing preset exposures plans to be made for the difference eclipse circumstances. Scroll down and skip this section to find a video if you prefer.
Set up the VIEW location and time
If the VIEW has a GPS module, it will automatically set the time and location when available, however, to setup a test for an upcoming eclipse, first disable the GPS (Settings->GPS Module) so you can enter coordinates and date/time manually. It’s best to use the exact location where you plan to be for the eclipse, but if you don’t have it, for the 2019-07-02 eclipse you can use a latitude of -30.115 and a longitude of -70.891. Use Settings->Set GPS latitude and Settings->Set GPS longitude for this.
For the time, use Settings->Set UTC Time and Settings->Set UTC Date. Note that the time is always set in UTC timezone rather than local time. Find the current time in UTC at time.is/UTC. The 2019-07-02 eclipse begins first contact around 17:23 UTC in Chile.
Set the timezone at Settings->Set Timezone to the local time-zone where you plan to be. For Chile this is GMT-4. This only affects the displayed times, not the internal calculations.
Once those settings are configured for the eclipse, you can then see the eclipse info in Information->Eclipse Info. Also, in the time-lapse setup menu (Timelapse) there will now be an option for “eclipse” in the Timelapse Mode setting. Once set to eclipse mode (this can be done stand-alone or with the app — on the app the follow settings will appear below, on the VIEW they are found in the Eclipse Circumstances submenu).
Each of the eclipse circumstances settings have their own set of exposure and time-lapse parameters, so each one is treated separately. Here is a list and description of each:
Pre-eclipse
This is the time-lapse settings leading up to the eclipse before the first contact. If the time is already past first contact, this option will not be visible. Typically you’ll be using a solar filter at this stage.
Partial (C1-C2)
This is the partial stage of the eclipse. Typically the best option is to have a preset constant exposure for the sun, since even though the overall brightness decreases, you’ll want to maintain the exposure for the highlights so the sun remains the same color. A solar filter is typically used at this stage.
Baily’s Beads (C2)
This is a brief period where the final points of the sun disappear behind the moon, and is best captured without a solar filter at a short interval (so get ready to remove the filter as soon as the interval jumps up). This phase is started a few seconds before totality up to a few seconds after.
Totality (C2-C3)
Totality is the highlight of the eclipse. The solar corona covers a broad exposure range, so to capture it adequately HDR is very important here. You should aim to cover as much range as you can. There are good exposure guides online for what the settings should be. The VIEW now supports native HDR with Nikon, and with the D850 in testing it was possible to capture a set of 9 frames, each 1 stop apart with a consistent 4-second interval. Most cameras, however, will require a longer interval with HDR, so be sure to test and confirm the bracket can fit within the interval as well as consider the compromise between range of HDR shots and number of frames in total.
Baily’s Beads (C3)
Working back now, this is the same as the first but with the sun breaking out again from behind the moon. Get ready to put the solar filter back on as the sun emerges.
Partial (C3-C4)
Again, same as the first but with the moon moving back off the sun. A constant exposure again is recommended.
Post-eclipse
At this point, the eclipse is done, and the post-eclipse mode could be set to auto ramping to then ramp into the night, or you can just keep it the same as the partial setting and stop it here.
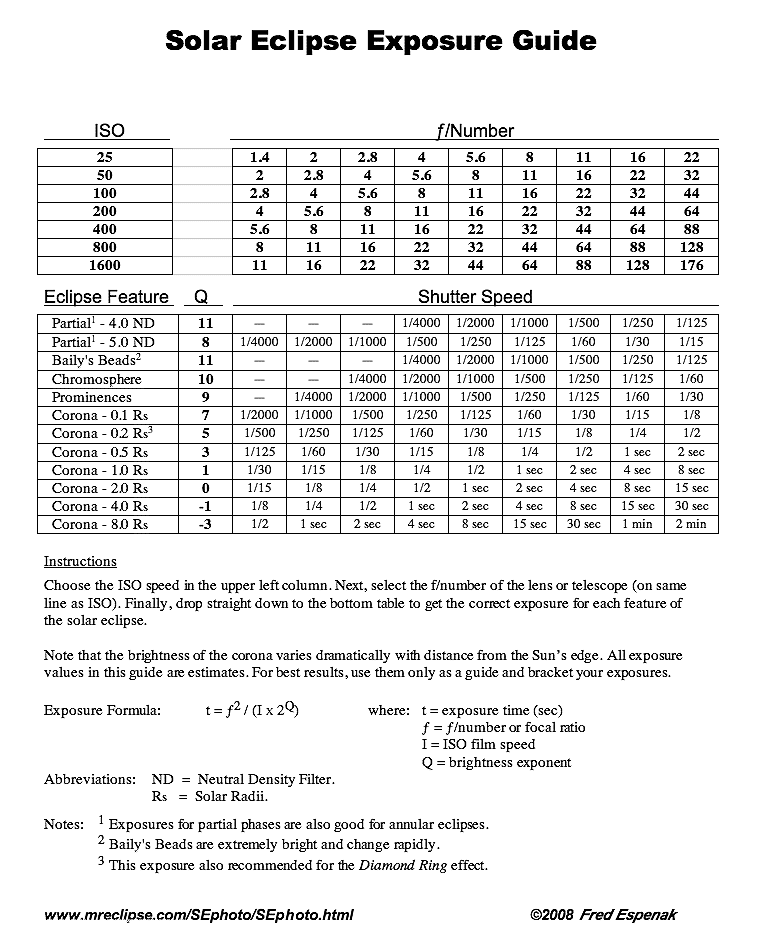
For exposure recommendations, check out this chart: http://www.mreclipse.com/SEphoto/image/SE-Exposure1w.GIF
Here’s a video walking through the testing setup:
TRACKING
If you're using a telephoto lens, you'll need some way to keep the sun in the frame. There are a few options for this:
-
Reposition the camera every couple minutes
-
Use a polar-aligned astronomical tracker (this is ideal, but hard to align during the day)
-
Use pan-head aligned with the north star (hard to do during daytime) and set it to turn at 15°/hour
-
Use a 2-axis pan/tilt NMX or Genie Mini system and use the VIEW's sun tracking feature.
Of the above options, I'll be covering #4 here -- tracking the sun with the VIEW. A couple things to note about a pan/tilt head vs a polar aligned system is that the pan/tilt head only needs to be level; you don't need to worry about polar alignment. Secondly, the camera frame will remain level during tracking, in contrast to a polar aligned axis where the frame will tilt according to the stars (which if you're doing stars, this is what you want). But the pan/tilt can be nice if it ends up including the horizon at some point, it's nice for it to show up at the bottom instead of a corner of the frame. Also, at present, this method only supports shoot-move-shoot, so long exposures with a telephoto aren't recommended (up to 1 second is probably ok during totality).
With a compatible pan/tilt motion system (eMotimo Spectrum, Dynamic Perception NMX +Sapphire or Stage-R pair, Syrp Genie Mini pair), the VIEW can be used to follow the sun or the moon.
The VIEW calculates the position of the sun based on the current coordinates and time, so as long as the sun is in the frame when it starts, it will continue moving the pan and tilt according to the relative change in the azimuth and altitude of the sun.
First, connect the motion system to the VIEW (see https://vimeo.com/338113886 for the Spectrum, https://vimeo.com/272647986 for the NMX, or https://vimeo.com/235979676 for the Genie Mini).
Then, to set up tracking on the app, change the mode shown for the pan and tilt axes to “tracking” and then below set the tracking target to “Follow Sun” or “Follow Moon”. Here’s another post with more details on setting up tracking: https://www.timelapseplus.com/blog/2018/7/26/lunar-tracking-using-the-view-intervalometer (it’s for the moon, but the same setup is for the sun, just change the target).
Just like everything else, it’s important to test the tracking setup. One thing to be aware of is that if the tracking follows the sun overhead, the center of balance of the tripod can shift, and if the setup is not especially rigid it could be problematic. For this reason, it’s good to test the tracking at the same time of day as the event, so that the test will me most accurate.
While the time-lapse is running, when tracking is enabled it’s possible to make tracking adjustments to realign it. On the intervalometer status screen of the app, the “Motion/Focus” section allows changing of the pan/tilt axes in +/- 0.1° increments, in addition to the tracking.
ECLIPSE DAY SETUP
First rule — don’t try anything new! If you didn’t test it, don’t do it! Make sure to keep all the settings the same as tested before.
One thing to be cautious with right now is that if you’re using a Nikon camera with the new driver, it will use native HDR bracketing, which is very fast (and recommended) but not all configurations are supported, and a fall-back mode is not in place yet. So make sure if you’re using Nikon to not change and HDR settings from what was tested (I recommend doing sets of 9, 1 stop apart — this is supported. With 9 frames, more than one stop apart is not supported with Nikon). With other cameras this isn’t significant since the HDR bracketing is managed by the VIEW.
Verify the location and time
This is an important step — if the location or time are incorrect (or not changed since testing earlier), it won’t work!
If you have a GPS version, enable the GPS (Settings->GPS Module) and ensure it gets a fix (see Information->GPS Info). If it doesn’t get a fix right away, try temporarily disabling wifi on the VIEW until it has a fix, then enable wifi again if needed.
If you don’t have the GPS version, make sure the coordinates entered in Settings->Set GPS latitude and Settings->Set GPS longitude match your current location exactly, as well as ensure that Settings->Set UTC Time and Settings->Set UTC Date are set exactly the same as time.is/UTC.
Then, set the timezone in Settings->Set Timezone (GMT-4 for the Observatory in Chile). Verify the timing on Information->Eclipse Info matches what you see at https://www.timeanddate.com/eclipse/map/2019-july-2 for your location.
Set up the equipment
Setup all the equipment (tripod, motion equipment, camera, cables, power supplies) just as tested and get everything lined up. Ensure cables won’t catch as the system moves to follow the sun during the total duration of the eclipse.
Make sure the VIEW is in access point mode (Settings->Wireless Setup->Enable Built-in AP) if you plan to monitor it from your phone (recommended).
Start Early
Start well before the first contact so that you have time to catch anything going wrong, such as a misalignment (from backlash, for example) or incorrect settings.
This post will continue to be updated through out the day in preparation for the eclipse. If you have questions or would like info added, please reply in a comment. Thanks!